How to Get Rid of Bloatware on Your Android Phone
Manufacturers and carriers often load Android phones with their own apps. If you don’t use them, they just clutter your system, or–even worse–drain your battery in the background. Take control of your device and stop the bloatware.
Uninstalling vs. Disabling Bloatware
You have a few choices when it comes to removing bloatware from your system.
Uninstalling an app is exactly what it sounds like: the app is entirely removed from your device. However, this has some downsides. Uninstalling some preinstalled apps may result in problems or instability, though, and in some cases may block your phone from getting updates. Furthermore, once these apps are gone, you might not be able to get them back. You may not think you want them back now, but you might in the future—who knows?
Some manufacturers have actually started to put their apps in Google Play—Samsung has been good about this, so if you remove something like S Health and then just need it back, you can get it from the Play Store. But others are not.
Lastly, uninstalling apps usually requires you to root your phone. This is not a process most users have gone through (or will want to).
That’s why, instead of uninstalling bloatware, we recommend disabling those apps instead. Android has a built-in way to do this, and it should work for most apps.
If you stumble upon an app that refuses to be disabled—which is rare these days—you can “freeze” it with a third-party app, which is essentially the same thing—though once again, this requires a rooted phone. So that is a last resort.
Got it? Good. Let’s talk about how to actually do this stuff.
How to Disable Bloatware With Android’s Built-In Setting
Disabling bloatware on newer phones is easy, and shouldn’t require root access. I’ll be using an unrooted Samsung Galaxy S7 Edge for this tutorial, but the process will be exactly the same regardless of which phone you have—the interface may just look a little different.
First, open the Settings menu. You can do this by pulling down the notification shade and tapping the little gear icon. Note: on some phones you may have to pull the shade down twice before the gear shows up.

Next, scroll down to Apps (or “Applications” on some phones). Tap that.

Find the app that’s causing you much pain, and tap it. I’m just going to use the “Dictionary” app here, because…why is this even on here in the first place?
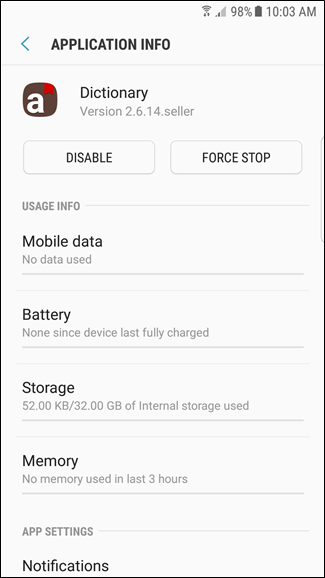
On the app’s info page, there are two buttons at the top (again, assuming this is a pre-installed application): Disable and Force Stop. I’ll give you two guesses which one we’re going to use here.

Once you tap the Disable button, you’ll get a scary little popup that tells you it may cause errors in other apps. Tread forward, brave soldier. Tap “Disable. ”

Bam, that’s it. After disabling it, you may also want to tap the “Force Stop” and “Clear Data” buttons as well.
If you ever need to re-enable the app, just jump back into it’s App Info page and tap “Enable.” It’s so easy.

Note that not all apps will have this disable option–but in most cases, they should. If they don’t, you’ll need to use the rooted method below to disable them.
How to Disable and Uninstall Bloatware on a Rooted Phone
If the app in question doesn’t have a disable option, or if you’re using an older version of Android that doesn’t have this feature, things get a bit more complicated. To start, you’ll need to root your phone, so if you haven’t done that, do that first. You’ll also need to enable USB debugging in Settings > Applications > Developer Options. And, as always, we recommend making a full nandroid backup before continuing in case something goes wrong.
There are many apps that claim to freeze bloatware, but at the end of the day, Titanium Backup is still the best on the block. We’ve already covered using Titanium Backup to back up and restore your Android Phone, but it has a number of other features too, including freezing and uninstalling bloatware. The only catch: you’ll need to pay $6 for the pro version.
If you’re dead set against paying $6 for Titanium Backup, you can try the free NoBloat or App Quarantine, but reviews are much more mixed. We’ve tested them and they worked fine for us, but your mileage may vary. Our previous recommendation, Gemini, no longer allows freezing in the free version. We have a lot of experience with Titanium Backup, and we know it works well on a variety of devices. Plus, it’s one of the most useful apps you can have on a rooted phone. So we’re going to use it for our tutorial.
To freeze an app with Titanium Backup, install Titanium Backup and the Pro key from Google Play. Launch the app and grant it superuser permissions when prompted.

Head to the “Backup/Restore” tab to see a list of apps on your system. You’ll see both apps you’ve installed and normally hidden system apps. Disabling important system apps could cause problems–for example, if you froze the Package installer app here, you wouldn’t be able to install packages. Be careful about what you freeze. You can always unfreeze apps later, but only if your system remains stable enough to do so.

Find the app you’d like to freeze and tap it. I’m using Android Pay here, mostly because it was at the top of the list. Tap the “Freeze!” button at the top.

It should take just a few seconds and you’ll see a toast notification that the app has been frozen. You’re pretty much done at this point.

It’s worth noting that the frozen app will still show up in Settings > Apps as “disabled.” For apps that can be disabled by default, simply tapping the “Enable” button will essentially unfreeze the app, which is nice. For apps that can’t be disabled, however, you’ll have to unfreeze them through Titanium Backup.
To do that, just jump back into Titanium Backup, find the app in the Backup/Restore list, and tap “Defrost” at the top. Nothing to it.

Once you run through either of these processes, those apps should be disabled completely, aside from taking up some space on your system. You won’t see them in the menus and they won’t run in the background. You may have to restart your device or launcher before the app icon disappears from the menus, but for all intents and purposes, they’re out of your hair for good.
No comments:
Post a Comment