How to Securely Wipe a Hard Drive on Your Mac

Thinking of giving an old hard drive to a friend, or taking it to be recycled? Be careful. When you delete a file on a mechanical drive, it’s not really gone—at least, not physically. Your file system marks the spot taken up by the file as “free space,” which is why you can sometimes recover deleted files.
With enough usage, new files will overwrite your deleted files, making them harder to recover. Until that happens, though, your files aren’t physically gone. As a result, it’s very important that you securely wipe a mechanical drive before giving it away or recycling it.
If you’re a Mac user, Disk Utility can write random information over any entire drive. A single pass with random data will foil most recovery software, but if you’re as paranoid as the US government, you can run multiple passes as well.
NOTE: it’s not really necessary to overwrite files on an SSD with TRiM enabled; your Mac is already deleting files completely to ensure fast write speeds later. This is much more important for mechanical drives with spinning platters.
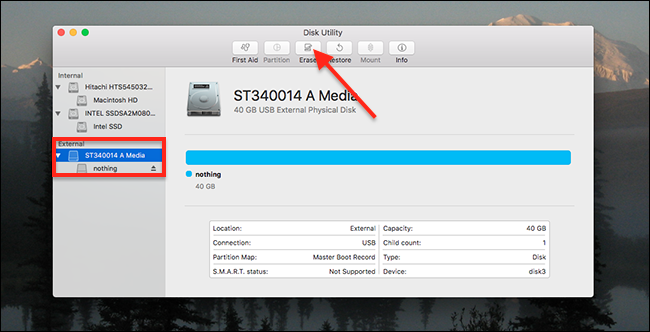
To wipe your mechanical drive, open Disk Utility, which you’ll find in Applications > Utilities.

Connect the drive you want to securely delete, then click it in the sidebar. Make sure you click the drive you want to securely delete: you do not want to erase some other hard drive by mistake! When you’re ready, click the “Erase” button.

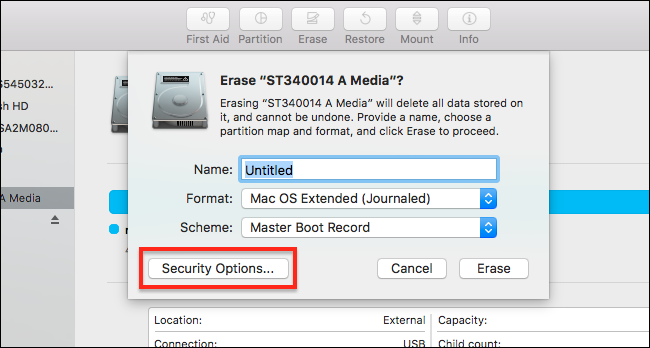
The erase dialogue will come up. Click the “Security Options” button on the bottom. You’ll see a sliding scale with four options:

The first option, “Fastest,” will delete the partition but leave all files untouched. That’s not what we want, so let’s move the slider. The first notch to the right of “Fastest” writes over the entire drive with random data once; the third notch, three times.

As we’ve discussed before, you probably only need one pass, at least with modern hard drives. But three passes is what the US Department of Energy uses to securely delete their files. The Pentagon is even more paranoid: they use seven passes.

Seven passes is going to take a long time, and even three passes will take at least an hour, so only use these options if you’re really, really paranoid.
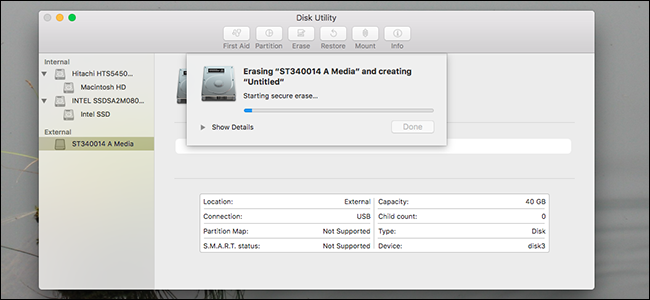
When you’ve picked how many wipes you’d like to run, click “OK,” then click “Erase” back at the initial prompt. Your Mac will begin wiping the drive.

The process will take a while, especially if you’ve opted for three or seven passes. Depending on the speed and size of the drive, a seven-pass run could take over a day, so don’t start this process if you need to take your laptop somewhere later in the day.
If you’re really pressed for time, there are easier ways to ensure your old data can’t be accessed—like with a hydraulic press.
If you don’t have a hydraulic press, a hammer should do the trick nicely. Both methods may adversely affect future performance of the drive, but are very effective at deterring file recovery efforts.
No comments:
Post a Comment